
diy vintage hats
Showing posts with label diy vintage hats. Show all posts

craft tutorials
diy vintage hats
free patterns
hair tutorials

Here's another vintage hat tutorial today, using some scraps from your stash and a hat base from your recycling bin. This little cocktail hat is an open fabric band embellished with millinery veil and little autumn berries.
You will need:
scrap of fabric- wool, velvet, whatever you like
a cereal box
millinery veil- available from JoAnne Fabrics or on etsy
flowers or berries of your choice. I found these from the dollar tree
PATTERN: download the pattern for free from Dropbox right here
trace your pattern onto the cereal box and cut two pieces

glue the two pieces together for more stability

cut your fabric band on the bias, so it bends around the age a little easier
glue the hat base together, forming a circle and whip stitch the fabric to the hat base.

cut your veil 1 yard long. Gather the veil by folding the long edge like an accordion, with small folds. sew back and forth through the accordion folds to secure.

Use a few anchor stitches to attach the veil to the hat band.


decorate the veil with berries, flowers or fabric bows. I used hot glue and tried to anchor most of the berries to the base and the center of the veil. If you like, you can cover the center of the veil, were most of the berry or flower stems are with a little bow. I found this vintage velvet ribbon in my stash.


You can also sew little hair combs to the inside band of this hat, if it doesn't want to stay on by itself.

How to Make a 1950s-60s Veiled Cocktail Hat

Here's another vintage hat tutorial today, using some scraps from your stash and a hat base from your recycling bin. This little cocktail hat is an open fabric band embellished with millinery veil and little autumn berries.
You will need:
scrap of fabric- wool, velvet, whatever you like
a cereal box
millinery veil- available from JoAnne Fabrics or on etsy
flowers or berries of your choice. I found these from the dollar tree
PATTERN: download the pattern for free from Dropbox right here
trace your pattern onto the cereal box and cut two pieces
glue the two pieces together for more stability
cut your fabric band on the bias, so it bends around the age a little easier
glue the hat base together, forming a circle and whip stitch the fabric to the hat base.
cut your veil 1 yard long. Gather the veil by folding the long edge like an accordion, with small folds. sew back and forth through the accordion folds to secure.
Use a few anchor stitches to attach the veil to the hat band.
decorate the veil with berries, flowers or fabric bows. I used hot glue and tried to anchor most of the berries to the base and the center of the veil. If you like, you can cover the center of the veil, were most of the berry or flower stems are with a little bow. I found this vintage velvet ribbon in my stash.
You can also sew little hair combs to the inside band of this hat, if it doesn't want to stay on by itself.

craft tutorials
diy vintage hats
free patterns
hair tutorials

Today we're continuing our weekly vintage hat tutorials in honor of National Make a Hat day, which was September 15th. Today I'll show you how to make a 1940s style halo hat with a few inexpensive craft supplies and very little need of millinery know-how. This is a great little hat that can be worn with lots of different hair styles. Wear your hair down and curly or in a snood, with victory rolls or bangs or a poodle! Lets get started....
You will need:
a thin headband, plastic or metal, mine is from the Dollar Tree
Stiff wire. You can use wire from the hardware store or a coat hanger works fine
craft felt (or wool felt if you're feeling fancy)
trimmings of any kind- feathers, sequin trim, beaded trim, flowers, etc.
sewing needle and matching thread or sewing machine
PATTERN: Download the pattern for free from Dropbox right here!
Cut out two pieces of felt. With both pieces together, stitch along the curved side, 3/8 inches from the edge.

Turn, press seam (as best as you can with craft felt, don't melt it to your iron!) and stitch again along the curved side, 3/4 inches from the edge to form a channel

Insert wire into the channel and trim the wire so there's about 1/2 inch of open space on each side of the channel.

Carefully stitch along the flat edge, 3/8 inch from edge, being mindful of the wire.

Stitch along the flat edge again, 3/4 inches from the edge to form another channel

Snip a little hole and insert your headband into this channel. You may need to trim the headband down to size. I used scissors on this plastic dollar store headband.
*note- you can reduce the bulk of your headband by removing any decorative fabric around the plastic or metal base*


Stitch the hole closed.
Bend the wire a little to shape your hat

Now time to decorate!! The sky is the limit here. Add flowers, beaded or sequin trim, leave it plain, whatever you like. This hat is based on one of my favorite 1940s hats from my personal collection so I'll show you how to make these felt pom poms just like my original!
Use black and blue felt (or whatever colors you like) and cut 5 circles of each color, 2 inches across and 5 strips of thin felt about 7 inches long.

Snip a hole in the middle of each circle and snip fringe along the outer edge of each circle. Tie a knot in the end of one of the felt strips and string a blue and black circle through each strip.


Hang the pieces at different lengths from the side of the hat. Cover the ends with a little felt bow. I used hot glue to stick these pieces on but sewing would be nicer.
I hope that you enjoyed this hat tutorial.We'll have one more next Tuesday!

How to Make a 1940s Halo Hat

Today we're continuing our weekly vintage hat tutorials in honor of National Make a Hat day, which was September 15th. Today I'll show you how to make a 1940s style halo hat with a few inexpensive craft supplies and very little need of millinery know-how. This is a great little hat that can be worn with lots of different hair styles. Wear your hair down and curly or in a snood, with victory rolls or bangs or a poodle! Lets get started....
You will need:
a thin headband, plastic or metal, mine is from the Dollar Tree
Stiff wire. You can use wire from the hardware store or a coat hanger works fine
craft felt (or wool felt if you're feeling fancy)
trimmings of any kind- feathers, sequin trim, beaded trim, flowers, etc.
sewing needle and matching thread or sewing machine
PATTERN: Download the pattern for free from Dropbox right here!
Cut out two pieces of felt. With both pieces together, stitch along the curved side, 3/8 inches from the edge.
Turn, press seam (as best as you can with craft felt, don't melt it to your iron!) and stitch again along the curved side, 3/4 inches from the edge to form a channel
Insert wire into the channel and trim the wire so there's about 1/2 inch of open space on each side of the channel.
Carefully stitch along the flat edge, 3/8 inch from edge, being mindful of the wire.
Stitch along the flat edge again, 3/4 inches from the edge to form another channel
Snip a little hole and insert your headband into this channel. You may need to trim the headband down to size. I used scissors on this plastic dollar store headband.
*note- you can reduce the bulk of your headband by removing any decorative fabric around the plastic or metal base*
Stitch the hole closed.
Bend the wire a little to shape your hat
Now time to decorate!! The sky is the limit here. Add flowers, beaded or sequin trim, leave it plain, whatever you like. This hat is based on one of my favorite 1940s hats from my personal collection so I'll show you how to make these felt pom poms just like my original!
Use black and blue felt (or whatever colors you like) and cut 5 circles of each color, 2 inches across and 5 strips of thin felt about 7 inches long.
Snip a hole in the middle of each circle and snip fringe along the outer edge of each circle. Tie a knot in the end of one of the felt strips and string a blue and black circle through each strip.
Hang the pieces at different lengths from the side of the hat. Cover the ends with a little felt bow. I used hot glue to stick these pieces on but sewing would be nicer.
I hope that you enjoyed this hat tutorial.We'll have one more next Tuesday!

craft tutorials
diy vintage hats
hair tutorials

Since September 15th is national make a hat day, I thought it would be fun to show you how to make a couple of vintage style hats for yourself throughout the month. No specialized millinery tools will be needed, we'll keep it simple. Come back every Tuesday for a new hat tutorial now till October 4th!
This week's hat tutorial takes a nod from many 18th century costumers with our hat base being made from a place mat. You can find these place mats at the dollar store, Walmart, Target and home decor stores. They come in all different colors. Mine is unfortunately not real straw, but a strange woven plastic material but that's alright!
The 15 inch place mat is too big so I snipped the edge of the place mat and unraveled it till it measured about 10 inches across.


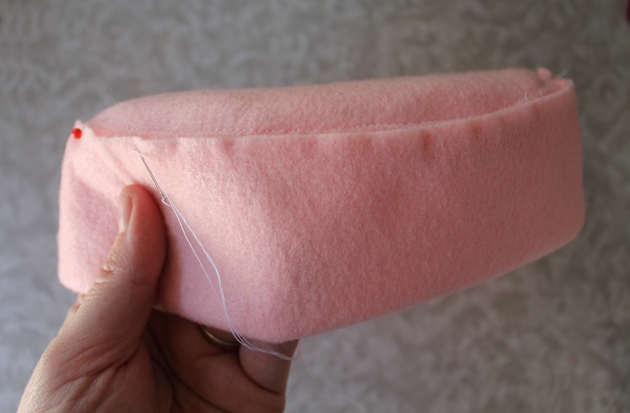
If you have a styrofoam head, tack the place mat down with two pins. If not, you can just hold it up to your own head to see where you want the bend in the hat to be. place the pins where the hat tie will attach. If you attach the ribbon closer to the outside edge, it will make the hat bow more, as shown below. You can get the tutorial for these pretty vintage style heads from Poupees on etsy. They're very easy to make and fun!

 Pinch the under side of the hat at the bend and sew in two little tacks to keep the bend where you like it.

I found these decent faux flowers at the dollar store. Pull your flowers apart and arrange however you like in the center of the hat.


I used hot glue to stick these guys in place. I found some vintage millinery feathers in my stash so I used one of those and a few pieces of faux grass to cover the funny little edge where we unraveled the straw.
On the back of the bend in the hat, make a large bow or you can add more flowers here. Sew or glue a wide fabric ribbon tie to the under side of the hat, near the center.

Make sure to trim any of these clear threads from the edge.

Arrange your hair however you like and tie the hat on. I've seen this style hat worn with hair down in a pageboy style or with an updo.


I hope you enjoyed this hat craft. Stay tuned next Tuesday for another vintage hat tutorial!
How to Make a 1940s Straw Tilt Hat
Since September 15th is national make a hat day, I thought it would be fun to show you how to make a couple of vintage style hats for yourself throughout the month. No specialized millinery tools will be needed, we'll keep it simple. Come back every Tuesday for a new hat tutorial now till October 4th!
This week's hat tutorial takes a nod from many 18th century costumers with our hat base being made from a place mat. You can find these place mats at the dollar store, Walmart, Target and home decor stores. They come in all different colors. Mine is unfortunately not real straw, but a strange woven plastic material but that's alright!
The 15 inch place mat is too big so I snipped the edge of the place mat and unraveled it till it measured about 10 inches across.


If you have a styrofoam head, tack the place mat down with two pins. If not, you can just hold it up to your own head to see where you want the bend in the hat to be. place the pins where the hat tie will attach. If you attach the ribbon closer to the outside edge, it will make the hat bow more, as shown below. You can get the tutorial for these pretty vintage style heads from Poupees on etsy. They're very easy to make and fun!
I found these decent faux flowers at the dollar store. Pull your flowers apart and arrange however you like in the center of the hat.
I used hot glue to stick these guys in place. I found some vintage millinery feathers in my stash so I used one of those and a few pieces of faux grass to cover the funny little edge where we unraveled the straw.
On the back of the bend in the hat, make a large bow or you can add more flowers here. Sew or glue a wide fabric ribbon tie to the under side of the hat, near the center.
Make sure to trim any of these clear threads from the edge.
Arrange your hair however you like and tie the hat on. I've seen this style hat worn with hair down in a pageboy style or with an updo.
I hope you enjoyed this hat craft. Stay tuned next Tuesday for another vintage hat tutorial!

craft tutorials
diy style
diy vintage hats
free patterns
sewing

This tutorial for a very simple vintage hat originally appeared on The Vintage Post, which isn't around anymore but I was able to find the steps to share with you here! No expensive millinery supplies here, just some craft felt and very basic sewing skills!


Check out my other craft tutorials on The Vintage Post:


Make a Simple Pillbox Hat
This tutorial for a very simple vintage hat originally appeared on The Vintage Post, which isn't around anymore but I was able to find the steps to share with you here! No expensive millinery supplies here, just some craft felt and very basic sewing skills!
Before I loved vintage clothes, I started collecting hats. I love crazy hats. They’re so unique and its an easy way to incorporate a little vintage in a modern wardrobe.
It wasn’t long before I started wanting to make a few of my own hats but millinery can be a very expensive hobby and supplies usually have to be mail-ordered.
Today I’ll show you how to make a very simple vintage style pillbox hat using craft felt. You can embellish this hat with millinery veil, flowers, little birds, ribbon- the sky is the limit!
You will need:
Craft felt by-the-yard cut in to a strip 26 inches long by 5 inches wide and a circle cut 8 inches in diameter
scissors
thread
pins
Pin the crown to the band, matching up the edges.
Using the presser foot edge as a guide, stitch all the way around the hat
When you reach the end, stitch the band edges together, trimming the excess.
Line the crown seam up with the edge of the presser foot, using it as a guide and stitch a decorative line all the way around the band
Turn the hat inside out and fold the band in half. Overlap the edge of the band with the raw edge of the seam and pin in place
Use small invisible hand stitches to tack the band in place
Turn the hat right side out and align the edge of the presser foot with the edge of the band. Sew a decorative line of stitching
Press the hat and decorate as you like or leave it plain! If you’re looking for millinery supplies to decorate your felt hats, you can find wonderful vintage millinery fruit, flowers, feathers and veil on etsy and ebay.
Some fabric stores carry modern millinery netting and tulle. You can also check out millinery supply sites like Judith M or Hatters Millinery Supplies
Be sure to follow my blog Va-voom Vintage for lots of vintage craft and more.
Until next time – Brittany
Check out my other craft tutorials on The Vintage Post:

Subscribe to:
Posts (Atom)