

beauty tutorials
hair tutorials
vintage hair
Tutorial: poodle pin curls and pigtail braids
Here's a fun summery look to try. I wore this hairstyle both last summer and few weekends ago when we went camping. It was great for playing in the river all day because it kept my hair out of my way and it stayed put, even in the heat.


Start by sectioning off the hair from the top of your head to your bangs and lining up with the edges of your eyebrows at the sides. Tie the rest back into a ponytail for now

Split this hair into about 10 sections, more if you can! Pin curl each section into stand-up pin curls. To do this, take one small section and hit it with a little hairspray or dry shampoo. Backcomb at the root to give it some long-lasting height.

wrap the end around your finger. Remove your finger and hold the hair like a disc, rolling it down toward the scalp. Pin into place my inserting a pin into the tiny roll.

Repeat with all 10 sections. If your bangs are tricky, you can use more hairspray or dry shampoo for grip and roll it around something small like a mascara tube.

Next, part the rest of your hair down the middle and braid into equal pigtails.

Finish off with a sheer scarf


Check out all of my hair tutorials here
Start by sectioning off the hair from the top of your head to your bangs and lining up with the edges of your eyebrows at the sides. Tie the rest back into a ponytail for now
Split this hair into about 10 sections, more if you can! Pin curl each section into stand-up pin curls. To do this, take one small section and hit it with a little hairspray or dry shampoo. Backcomb at the root to give it some long-lasting height.
wrap the end around your finger. Remove your finger and hold the hair like a disc, rolling it down toward the scalp. Pin into place my inserting a pin into the tiny roll.
Repeat with all 10 sections. If your bangs are tricky, you can use more hairspray or dry shampoo for grip and roll it around something small like a mascara tube.
Next, part the rest of your hair down the middle and braid into equal pigtails.
Finish off with a sheer scarf
Check out all of my hair tutorials here

DIY Blog Graphics with BeFunky
It's been awhile since I shared any blogging tips so today I thought we'd do a little DIY blog design with a really neat new site, BeFunky, where you can design your own graphics for your blog, social media pages and Etsy listings.

I've been using sites like this for a long time to design blogs for friends, family, other bloggers and myself. I've only just started learning to use Photoshop but if you're a blogger or business owner on a budget, graphic design sites like this are invaluable. I use similar photo editors on a near daily basis so I was excited to start playing with the features from BeFunky.
This week, BeFunky launched a new Designer Toolset with loads of professional templates designed for bloggers. Today, I'll show you how to use the blog images templates and blog titles templates to give your post some extra pop. A well designed graphic with text overlay and quality photos will help draw attention to your social media posts and bring more traffic to your blog. Let's get started!
When you log into BeFunky, click the colorful "b" at the top left corner and you'll see a drop down menu of options. From here, select "blogger templates"

The blogger templates section includes everything you'll need for promoting your blog on social media, creating Pinterest friendly graphics and beautiful eye-catching title graphics for your blog.
A title graphic is a great tool to implement in your post. When your readers scroll through their blog feeds or Facebook, these attention-getters really draw them to reading your post so make it a good one!
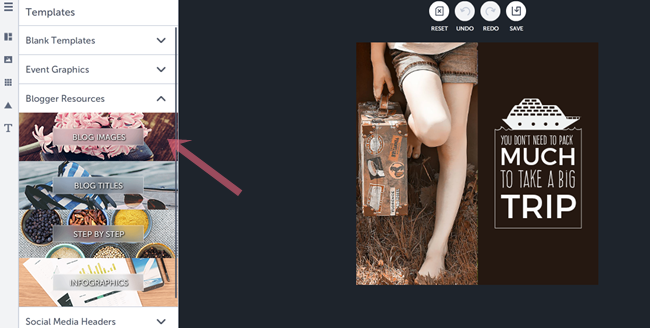
For this tutorial, I'm going to use an old post, my vintage girdle guide. This is a great post but it doesn't get much love so I'd like to bring it back to life. Giving old posts a face lift is a great way to promote old content. I'm going to start with this template, which has nothing to do with vintage or girdles, but you'll see how easy it is to make a template your own!

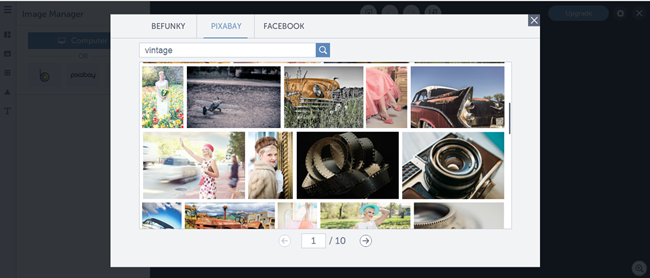
First, we'll replace the background image. Click the photo icon on the left menu and the next menu will pop up. You can choose an image saved to your computer, your Facebook page or select from over 430,000 free images from Pixabay. I used some keywords like "vintage" "lingerie" "retro fashion" to search Pixabay but I didn't find anything that jumped out so I used a vintage girdle advertisement instead.
Click on the image in the template and select "replace image". Choose the image that you would like to use on your desktop

To change the text, simply click on the text in the template and a text editor menu will appear. Each line of text can be styled differently, deleted or added to. BeFunky has a large selection of excellent fonts under the "Ours" menu but you have the option to use any of the fonts downloaded to your computer under the "Yours" menu. Change the color, size and spacing in the "edit selection" menu
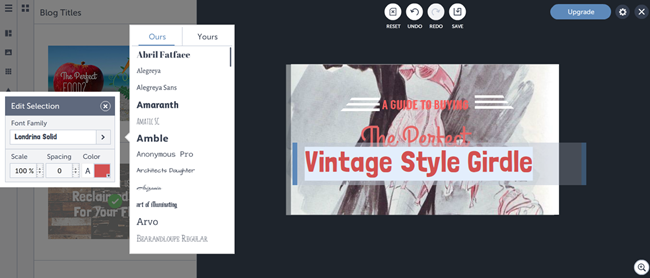
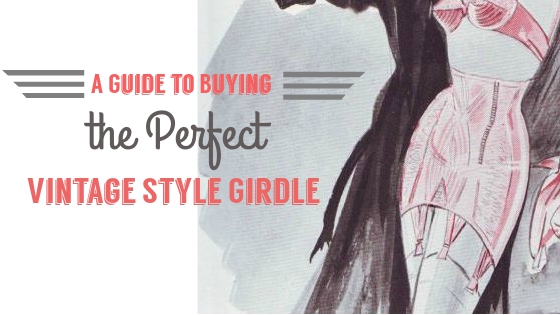
As I was editing the text, I quickly realized that the text would be difficult to read with my image background, which is a common problem. It's very important to choose images with plenty of blank space or a background that isn't too busy, that way your text will pop. Select colors that stand out and compliment your background image as well. In this instance, the background is both black and white so there wasn't really any text color that I could select that would stand out as much as I had hoped. Luckily, I can just grab by image background and move it off to one side, leaving plenty of blank space for my text

When mixing fonts, you can almost never go wrong with one bold font and one curly font. Here I'm using Grand Hotel and Langdon, both available from BeFunky.
You can also change the decorative graphics. I flipped these little lines and changed them from white to dark gray to match my image. To flip the decorative graphics around, just click them and the menu to change it all around will pop up. Play with it and move it around until its just perfect.
Next, I saved my design to my computer and opened it up in the BeFunky photo editor so I could add a frame. I selected the simple border and dragged the color selector over my text so I could match the colors exactly.

Use these techniques to customize any BeFunky template for your blog. Here's a look at what you can do with the blog images template, using a stock image from Pixabay. Blog images are a great way to promote events on social media, use in your sidebar or in a post.
And here's another before and after using one of the Pinterest templates. In this example, I kept the layout, swapped out the image and changed the color of the circle graphic and re-sized it just a smidge. I'm using Abril FatFace and Raleway fonts. I didn't find any curly fonts that stood out to be so I mixed bold and skinny type.

There's really no limit to what you can do! Also check out the photo editor and collage maker, which has dozens of pre-set templates or the option to make your own, all priceless time saving tools for bloggers.
This post is sponsored by BeFunky. Please see my full disclosure policy.
I've been using sites like this for a long time to design blogs for friends, family, other bloggers and myself. I've only just started learning to use Photoshop but if you're a blogger or business owner on a budget, graphic design sites like this are invaluable. I use similar photo editors on a near daily basis so I was excited to start playing with the features from BeFunky.
This week, BeFunky launched a new Designer Toolset with loads of professional templates designed for bloggers. Today, I'll show you how to use the blog images templates and blog titles templates to give your post some extra pop. A well designed graphic with text overlay and quality photos will help draw attention to your social media posts and bring more traffic to your blog. Let's get started!
When you log into BeFunky, click the colorful "b" at the top left corner and you'll see a drop down menu of options. From here, select "blogger templates"
The blogger templates section includes everything you'll need for promoting your blog on social media, creating Pinterest friendly graphics and beautiful eye-catching title graphics for your blog.
A title graphic is a great tool to implement in your post. When your readers scroll through their blog feeds or Facebook, these attention-getters really draw them to reading your post so make it a good one!
For this tutorial, I'm going to use an old post, my vintage girdle guide. This is a great post but it doesn't get much love so I'd like to bring it back to life. Giving old posts a face lift is a great way to promote old content. I'm going to start with this template, which has nothing to do with vintage or girdles, but you'll see how easy it is to make a template your own!
First, we'll replace the background image. Click the photo icon on the left menu and the next menu will pop up. You can choose an image saved to your computer, your Facebook page or select from over 430,000 free images from Pixabay. I used some keywords like "vintage" "lingerie" "retro fashion" to search Pixabay but I didn't find anything that jumped out so I used a vintage girdle advertisement instead.
Click on the image in the template and select "replace image". Choose the image that you would like to use on your desktop
To change the text, simply click on the text in the template and a text editor menu will appear. Each line of text can be styled differently, deleted or added to. BeFunky has a large selection of excellent fonts under the "Ours" menu but you have the option to use any of the fonts downloaded to your computer under the "Yours" menu. Change the color, size and spacing in the "edit selection" menu
As I was editing the text, I quickly realized that the text would be difficult to read with my image background, which is a common problem. It's very important to choose images with plenty of blank space or a background that isn't too busy, that way your text will pop. Select colors that stand out and compliment your background image as well. In this instance, the background is both black and white so there wasn't really any text color that I could select that would stand out as much as I had hoped. Luckily, I can just grab by image background and move it off to one side, leaving plenty of blank space for my text
When mixing fonts, you can almost never go wrong with one bold font and one curly font. Here I'm using Grand Hotel and Langdon, both available from BeFunky.
You can also change the decorative graphics. I flipped these little lines and changed them from white to dark gray to match my image. To flip the decorative graphics around, just click them and the menu to change it all around will pop up. Play with it and move it around until its just perfect.
Next, I saved my design to my computer and opened it up in the BeFunky photo editor so I could add a frame. I selected the simple border and dragged the color selector over my text so I could match the colors exactly.
 |
| Before Customizing the Template After working some BeFunky magic |
Use these techniques to customize any BeFunky template for your blog. Here's a look at what you can do with the blog images template, using a stock image from Pixabay. Blog images are a great way to promote events on social media, use in your sidebar or in a post.
 |
| BeFunky Template After Customization |
And here's another before and after using one of the Pinterest templates. In this example, I kept the layout, swapped out the image and changed the color of the circle graphic and re-sized it just a smidge. I'm using Abril FatFace and Raleway fonts. I didn't find any curly fonts that stood out to be so I mixed bold and skinny type.
There's really no limit to what you can do! Also check out the photo editor and collage maker, which has dozens of pre-set templates or the option to make your own, all priceless time saving tools for bloggers.
This post is sponsored by BeFunky. Please see my full disclosure policy.

Bus Stop

This morning, my little girl got on the bus to go to her first day of school as a kindergartener and I'm feeling so excited and so devastated at the same time!
Many of you have been reading this blog since the beginning, when my little girl, Olivia was just 3 months old. You've seen her go from being a little baldy girl to a grown up, stylish little lady.
 |


The bus pulled up and I thought she must be really nervous but she ran up the stairs and wasn't going to stop for pictures until the driver told her to turn around and smile at mom. She picked a seat and was too busy waving at a friend from up the street to wave at mom, dad and grannie out the window. She's ready!

What I wasn't fully prepared for was her poor little brother. He was all excited about this school stuff until he saw his other half hop on that bus and drive away, out of sight.

He cried "I miss Olivia!"
His Grannie tried to reassure him that she'll be home soon. She said "Will you make her a card for when she comes home today?" "no." he sobbed. "Will you make her a lego house?" "no." He trudged up the front steps, came inside and plopped in front of his lego box with teary eyes.

We spent a long time talking about all of the things we will do together, just the two of us. We can cook, watch movies, go to the park with our friends, play games, build legos. I'll climb under the tents we'll make with blankets and we'll eat popcorn. We'll play in the pool and in the snow, just the two of us. And next year, he can start school too.
I'm very excited about this big change, though. Olivia will love school and while she's away, Rhys and I will have lots of time together to get him ready for his big day next fall. Without the world's biggest mess maker in the house, I look forward to getting more blogging in, lots of sewing projects, knitting and cooking. It's strange not knowing what she's doing every minute of the day but it's a very welcome change. It's been a few hours since she got on the bus and even Rhys is enjoying himself! I can't wait for her to come home to hear all about her first day of school!

sewing
Vintage Sewing Pattern Sale Preview and Pattern Grading Roundup
Tomorrow, my friend Katie, author of Cool Shit I Thrifted will be listing some gorgeous vintage
sewing patterns that she found for sale on Instagram! Being a pattern hoarder, I
had to pick one too. I've been in love with this suspender skirt from Modcloth and look at this, now I can make my own!

There's some wonderful Mad Men style patterns, a few beautiful 40s separates, lots of great skirts and combination patterns to sew a whole outfit to mix and match. Here are just a few of my favorites:


Many vintage sewing patterns are in the smaller range but they can be graded to a larger size. Here are some fantastic resources and tutorials for sizing up your vintage sewing patterns:
How to Grade Up a Vintage Pattern from the Curvy Sewing Collective
How to make a sewing pattern bigger or smaller from Melly Sews
for more in-depth grading and videos, also check out Craftsy's course, Create Any Size: Pattern Grading for Sewers
Follow Katie on Instagram @coolshitithrifted. The pattern sale starts at noon CST Sunday!
disclosure: this post contains link to my affiliates. Please see my full disclosure policy

beauty tutorials
hair tutorials
vintage hair

Today I'll show you how to style the much-coveted Bettie Page/Dita Von Teese pageboy hairstyle with that lovely dent in the back! It's easy and you don't need a special haircut to make it work. I had planned on posting this next week but since Pj got rained out today, he was home to help with the pictures (Thank you, Pj!)
I did a video and photo tutorial for this look so you can see the motions but also get the step-by-step look and some additional photos here in the post.
Before we begin, I had some questions about my hair cut. It's just cut straight across (or as straight as my husband could cut it a few weeks ago!), all one length, no layers. My bangs are nose length and it's naturally oily and is color treated. My hair is very straight and it doesn't take to a curling iron or hot roller very easily so I used pin curls for this tutorial but you don't have to! Use whatever curling method works best for your hair, be it hot roller, foam rollers, curling iron, etc.

If you're interested in trying pin curls like I did here, this is the pattern. Feel free to change it according to your hair thickness and type. If you use rollers, roll it all downwards, following the same placement as the pin curls and using the smallest roller size. If you need help with pin curls, check out my tutorial, Pin Curls 101 for tips I've learned over the years and a video on how to roll and brush out your pin curls.
These clips shown below are vintage, found on Ebay. They're called "Bell Professional Pin Kurl Klasps" or "Bell Professional Kurl Klasp Kit". The dent in the middle of the clip is supposed to prevent dents in your pin curls. I've searched for a modern equivalent but there's nothing quite like these on the market. I did find these padded pin curl clips on Amazon that may be worth checking out but you can use regular pin curl clips or bobby pins. I've always had good results with both.


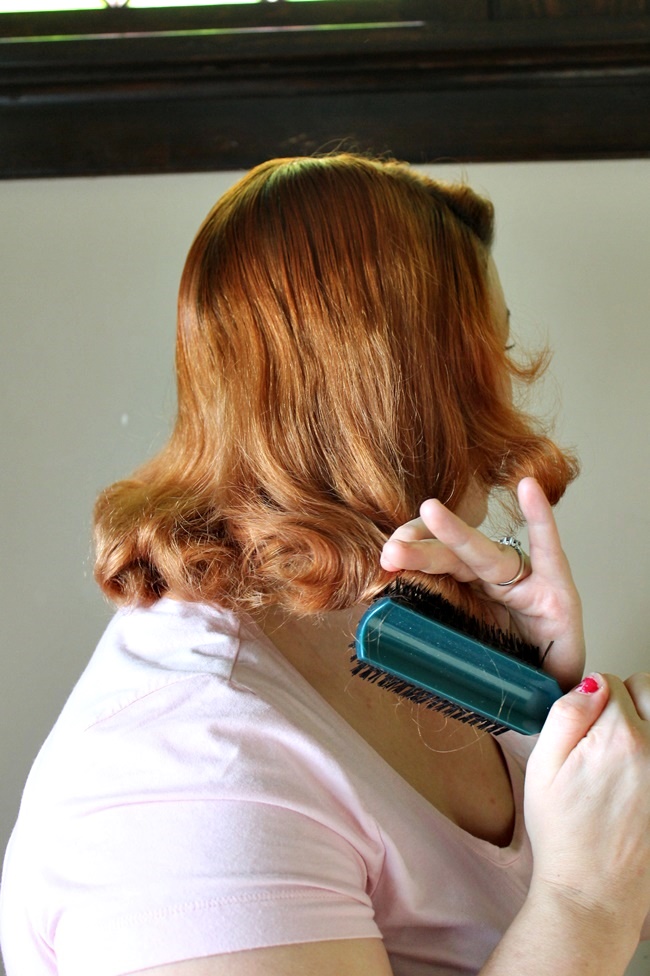
I removed my pin curls and used a cheap dollar store soft bristle brush to brush the curls out. To start, just brush out sections, curling the hair under. Brush sections over your hand to smooth out the curl. You can also use the hair brush to curl the hair under like so:


Oh wow, I need to do my nails immediately after writing the post. Eh- life of a girl who hand washes her dishes! Anyway....Now my hair is generally brushed under all around and it's not so wild so we're ready to really start forming the shape of this style.

Now for the dent! Special thank you to the beautiful Lindsay Lane for her tips on getting the dent shape here. I tried all kinds of methods found on You Tube videos but her tips worked the best! Start at the top of your head and brush straight down, stopping at the base of your skull. Do this all the way around your head, stopping where you want the dent to be. You can use a comb for this, if you like but I'm using the soft bristle brush to help smooth the hair out.


Now that you have a dent, you'll notice the curled- under ends are a little messy. Just repeat brushing the hair under and use your fingers to spread the hair out into a continuous curtain. If it separates use the brush to gently comb over that section. It's a fiddly hairstyle so I just keep messing with it, shaping the curl and brushing down to the dent until its just right.

If you part your bangs off to the side like mine, section it off and backcomb a bit to give it height. Sometimes I'll hit it with some dry shampoo to keep it really high but eh-not today. Smooth it out with the soft bristle brush and comb it under to match with the rest of the curl. This is a perfect style for a girl with Bettie bangs or faux bumper bangs too!

Hit it with some hair spray and use some pomade or anti frizz cream to smooth out the fly-aways and you're ready to go!

This style lasts all day for me when I use pin curls. I don't wear this look when I know I'll be in the heat or rain for a long time but for a regular day mostly indoors or a really nice, not too windy day, it's perfect. In the evening, you can roll it or re-pin again without getting it wet and it'll be easy to brush out and style for a perfect day two pageboy.


Pin it for Later!


How to Style a Perfect Pageboy Hairstyle
Today I'll show you how to style the much-coveted Bettie Page/Dita Von Teese pageboy hairstyle with that lovely dent in the back! It's easy and you don't need a special haircut to make it work. I had planned on posting this next week but since Pj got rained out today, he was home to help with the pictures (Thank you, Pj!)
I did a video and photo tutorial for this look so you can see the motions but also get the step-by-step look and some additional photos here in the post.
Before we begin, I had some questions about my hair cut. It's just cut straight across (or as straight as my husband could cut it a few weeks ago!), all one length, no layers. My bangs are nose length and it's naturally oily and is color treated. My hair is very straight and it doesn't take to a curling iron or hot roller very easily so I used pin curls for this tutorial but you don't have to! Use whatever curling method works best for your hair, be it hot roller, foam rollers, curling iron, etc.
If you're interested in trying pin curls like I did here, this is the pattern. Feel free to change it according to your hair thickness and type. If you use rollers, roll it all downwards, following the same placement as the pin curls and using the smallest roller size. If you need help with pin curls, check out my tutorial, Pin Curls 101 for tips I've learned over the years and a video on how to roll and brush out your pin curls.
These clips shown below are vintage, found on Ebay. They're called "Bell Professional Pin Kurl Klasps" or "Bell Professional Kurl Klasp Kit". The dent in the middle of the clip is supposed to prevent dents in your pin curls. I've searched for a modern equivalent but there's nothing quite like these on the market. I did find these padded pin curl clips on Amazon that may be worth checking out but you can use regular pin curl clips or bobby pins. I've always had good results with both.
I removed my pin curls and used a cheap dollar store soft bristle brush to brush the curls out. To start, just brush out sections, curling the hair under. Brush sections over your hand to smooth out the curl. You can also use the hair brush to curl the hair under like so:
Oh wow, I need to do my nails immediately after writing the post. Eh- life of a girl who hand washes her dishes! Anyway....Now my hair is generally brushed under all around and it's not so wild so we're ready to really start forming the shape of this style.
Now for the dent! Special thank you to the beautiful Lindsay Lane for her tips on getting the dent shape here. I tried all kinds of methods found on You Tube videos but her tips worked the best! Start at the top of your head and brush straight down, stopping at the base of your skull. Do this all the way around your head, stopping where you want the dent to be. You can use a comb for this, if you like but I'm using the soft bristle brush to help smooth the hair out.
Now that you have a dent, you'll notice the curled- under ends are a little messy. Just repeat brushing the hair under and use your fingers to spread the hair out into a continuous curtain. If it separates use the brush to gently comb over that section. It's a fiddly hairstyle so I just keep messing with it, shaping the curl and brushing down to the dent until its just right.
If you part your bangs off to the side like mine, section it off and backcomb a bit to give it height. Sometimes I'll hit it with some dry shampoo to keep it really high but eh-not today. Smooth it out with the soft bristle brush and comb it under to match with the rest of the curl. This is a perfect style for a girl with Bettie bangs or faux bumper bangs too!
Hit it with some hair spray and use some pomade or anti frizz cream to smooth out the fly-aways and you're ready to go!
This style lasts all day for me when I use pin curls. I don't wear this look when I know I'll be in the heat or rain for a long time but for a regular day mostly indoors or a really nice, not too windy day, it's perfect. In the evening, you can roll it or re-pin again without getting it wet and it'll be easy to brush out and style for a perfect day two pageboy.
Pin it for Later!

Subscribe to:
Posts (Atom)