


Bullet Bra Sew-Along day 1 Download the pattern and get sizing info
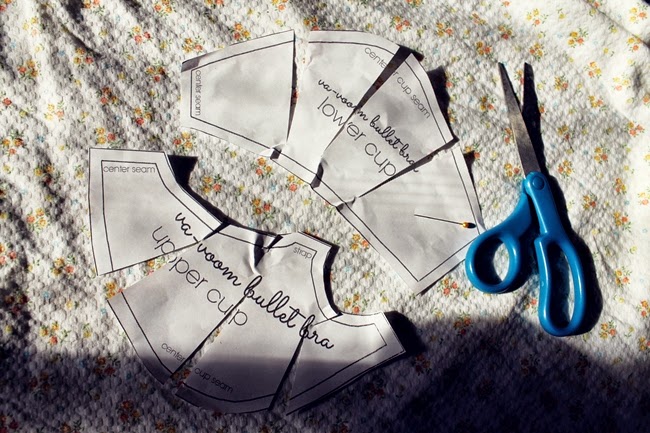
Bullet Bra Sew-Along day 2 Cut and assemble the cups, learn about circle stitching
Bullet Bra Sew-Along day 3 Attach the front and size bands and make sizing adjustments in the band
Bullet Bra Sew-Along day 4 Finishing the bra and attaching straps and closures
Well here it is! I've wanted to make pdf sewing patterns for many years and finally *I think* I've figured out how to do it. I have some more ideas for pattern designs so I'm hoping to work on a few of those in 2014 and figure out a more professional way to make these instead of my silly little photo editor! But hey, not bad for a girl who had no clue where to start! Anyway...
Originally the plan was to post one in every size that I can find but I didn't want to post them without testing the pattern for fit on live models. I will be testing the B cup and D cup and posting as soon as it's ready.
Printing directly from dropbox results in wonkiness so please click the link below, save to your computer, open pdf and print. Please set your printer to print at "100%"
download DD (E) cup bullet bra pattern
download C cup bullet bra pattern
Sizes available will depend on the boobs that are available to me and the schedules of the ladies that they are attached to! Thank you to the boob-donors that have made this pattern possible!
Let's Talk About Bra Sizes
A bullet bra will not fit the same way that a modern underwire bra does. The shape and depth of the cups are quite different. I usually wear a modern cup size DD but in a vintage bra, I can often fit very well in a C cup!
I'm sure that's not the case for all of us so work up a muslin and see what works for you! The bra size numbers presented on these patterns came from original vintage bullet bras, so they will also differ from your modern bra size.
Modern bra sizes are a royal pain, as we all know. Cup sizes vary by manufacturer and some of them have this ridiculous formula of "measure here, measure there, subtract this to get that..." When it comes to vintage bra sizes, throw all of your modern understanding out the window.
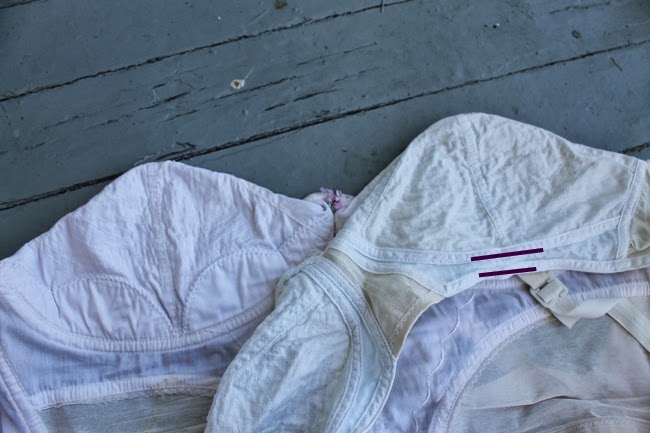
Here are two vintage bras in a B cup 38 and 42. The cup sizes are the same size! When I was making this pattern, I compared cups B-DD from over 30 vintage bras and had the same results around. The cups are the same size for that letter.

On occasion, I'd have a very small (around 1/4 inch depth) difference in cups from different manufacturers, like the photo below. In this example, this is a 38C and 42C. You can see that the cup of the 38 is just a tad smaller in depth than the 42. You may need to adjust your muslin here and/or at the center seam if the cup is baggy.
Ladies with larger breasts that need more cup depth may add a little here, at the center seam and/or along the top if you need more coverage. Also, if you feel like you need a wider side band, you can always add a little to that as well.
Since we're all different shapes and sizes, you may need some alterations to get your bra to fit just right. I highly recommend sewing this bra in muslin before using a nice fabric. You may also make a cup in paper and tape it all together. Try it on without a bra on to see if it fits your breast. The band size on this bra is adjustable by lengthening or shortening the side band along the dotted line.
Grading up a size or two
I've had a lot of comments from ladies who are much-blessed in the bra department so here are some tips on making this pattern bigger. Don't be afraid to make some tweaks here and there to get a great fit. Once you have a perfect fit, cut your pattern in muslin and make notes in the pattern so you always have a perfect bullet bra pattern for your size and shape.
Slash and spread
The typical method of grading patterns up a size is to slash the paper and spread it apart, trace around your spread-out pattern and cut out the new, larger pattern piece. Simple! :
Add to the top and bottom
The slash and spread will add more across the breast but you may find that you're still spilling out the top and/or bottom. If that's the case, add a little to the top and bottom for more coverage:
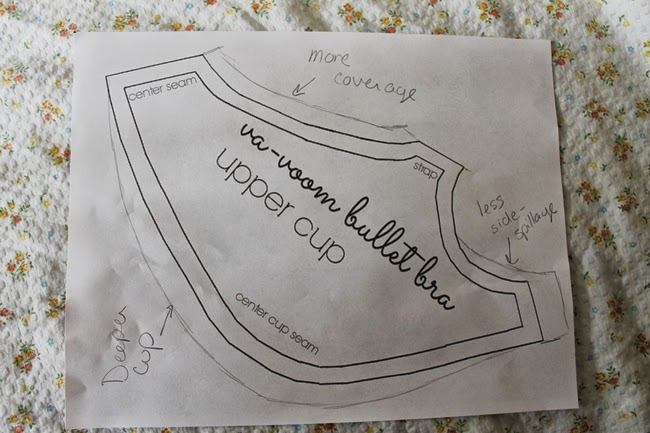
Remember, if you do any changes to the cups, you may also have to lengthen the front band a bit.
For Smaller Sizes
If the cup is too deep, you can take it in a bit at the center seam or use bullet bra pads to fill in the extra space, like many women did back in the day. You can purchase bullet bra pads from What Katie Did or make your own using this Youtube tutorial
Terms of use: this pattern is available for free because I want everyone to be able to enjoy it and make their own bullet bras. It took many long hours of tedious work to draft, fit, test and write the tutorial for this pattern. This pattern may not be posted for sale.
This pattern may not be altered in any way and posted for sale. You may use this pattern to make bras for sale as a home sewer, limit 300 bras per year. Not to be used for commercial mass production. If you do make bras, please drop me a line with your shop link and I'll give you a shout out on the blog. Pattern copyright Brittany Sherman 2013.
Stay tuned Monday for Day 2 Cutting and Cup Assembly
I was up rather early today, so I knew I had to head on over here to download the pattern ASAP!!! So excited about this. If I'm any good at making a BB, then I may never have to buy bras again!!!!
ReplyDeleteThank you! What size is the band drafted as without modification?
ReplyDeleteTHANK YOU SO MUCH! I've been searching for this exact pattern for so long. I definately will be making one. Or two.
ReplyDeleteOr thirty.
-Holly Brown
Lol! for some reason I thought we were going to complete the whole project today! I was game but I'm glad it will be broken up a little and I can still enjoy some other things on a rare free Saturday :-)
ReplyDeleteOne of the reasons I've long loved bullet bras and those with pointed, but not quite as "tail light-esque", cups is that I find they help give my breasts, which are very average sized and not terribly full, a really nice bit of added shape, that I much prefer over modern padded numbers (which always seem and feel really fake - yes, no one things my girls are shaped like bullets, but somehow the iconic shape of bullet boobs, just feels more natural to me than a mattress' worth of, often uncomfortable, padding).
ReplyDelete♥ Jessica
I am away this weekend but I will download and get started when I return home on Monday. I have been wanting to try bra making for a while. Thank you
ReplyDeleteGreat, Jennifer. You and me are on the same schedule for I ran out of ink AND I am attending a two-day Circuit Assembly today and tomorrow.
DeleteToday, in a quite the long time, I was thinking about my (ehmmm.. how to put this?) - Feminine Front. And lasted quite long, the thinking. When it comes to brassieres - I don't tend to turn into a shopping maniac. Quite the opposite - I shy away from "that part" of any shop.
ReplyDeleteThe reason?
My masculine figure doesn't leave much space to the (ehmm..) Feminine Front. Let's just say: there's not much there. So, when it comes to shopping for a new piece I go for shape-wear; that is - I buy those that FAKE it.
(there, I've said it)
Marija
There's certainly nothing wrong with that! We'll be making some bullet bra pads after the sew-along to help fill out those deep cups! :)
DeleteOh, now we're talking!
DeleteI'll make sure not to miss it out, dear!
Marija
Hej Brittany,
DeleteI may be a bit blind or something :o} But where I can find the making of bullet bra PADS?
I really need a little help and some ideas, how to fix the right shape for a bullet bra at an usual bra pad.
Greetings from Europe 0:o)
Hey, here's a you tube video that may help! Hope it works!! https://www.youtube.com/watch?v=G1B8gmN3kPo
DeleteThank you!
DeleteBut "Unfortunately, this video is not available in your [my] country because it could contain music from UMG, for which we could not agree on conditions of use with GEMA". Damn GEMA *sigh*
So I'll look thru the videos listed right. Better than nothing.
Have a good day :o)
I am so excited about this! Thank you, thank you, thank you!
ReplyDeleteI might be working behind ya, but I'm in! i am quite excited about this and am wondering about the pads (if they make the bullet less bullety or something). Just wondering. Either way this will be cool to add to my repertoire of sewing and will make for excellent blogging! ;-)
ReplyDeletenope they make them more bullety! *lol* So, if your breast doesn't quite fill the cup out, you may want pads for a pointier shape. If you're very blessed in the boob department you'll probably do fine without :P
Delete" It took many long hours of tedious work to draft, fit, test and write the tutorial for this pattern. This pattern may not be posted for sale."
ReplyDeleteBritt, thank you for all you put into this tutorial AND for all that you do and share, girl. I am so blessed to have crossed your path.
L
I think you are brilliant :) That's all! (I only wish the other boobs would hurry up and make themselves available to you ;) )
ReplyDeleteThank you!! I hope I get more boobs too!! I have a lovely B cup model who will be available to me in November/December and I'm hoping for a D cup model soon. I had some ladies in my life who recently had babies and have been nursing so the boobs have been all crazy sizes for a while :P
DeleteThis is amazing! I'm not a sewer, but if I was, I would try my hand on this. Maybe one day.
ReplyDeleteThe pattern doesn't say what size paper to print on?
ReplyDeleteIt's just regular 8.5 X 11 multi-purpose printer paper
DeleteCan't wait to give this a try! I cant do it right now with so much going on in my world but am definitely saving this for my very next sewing adventure. One question, should we go with our normal, modern day cup size? If so, Im a D cup so I will have to wait for a boobie model to help you out. I would gladly do that for you if I could get the boobs to ya! HA!
ReplyDeleteYay! I've waited for this post to come up since april when you blogged about your vintage bullet bras. Thank you for making it a free pattern (with the restricitions noted). Have you thougt about attaching a Creative Commons-license to it?
ReplyDeleteI'm having issues printing the C cup pattern. When I set my printer to 100%, the side band gets cut off the edges of the page. :(
ReplyDeleteWith trepidation I am going to try this style of bra. I hope it does lift my bosom (saggy F cup, breastfed my 4 beautiful children long term). I've always assumed bullet bras would make me look bigger and weirdly 'pointy' but you've convinced me to give it a try!
ReplyDeleteOh wow, I've been dreading trying to make a bullet bra pattern for ages... and here you've done the hard work for me! I'm a starting-to-sag DD and I am REALLY looking forward to the extra support of a bullet bra to stop the downward march of the girls.
ReplyDeleteI'd really like to give this a try but the link for the pattern doesn't seem to be working? Is there any chance you could re-upload it at all?
ReplyDeleteOh, wait, I apparently saved it to my laptop last time I looked at it (I don't remember doing that, but oh well)
DeleteHi the linkto the bigger size seems to be disabled ?
ReplyDeleteI think dropbox has been having some security issues. I re-activated it so it should work now :)
DeleteThank you :)
ReplyDeleteMade my first today, from the legs of some combat trousers. Fantastic pattern, thanks for sharing !
ReplyDeleteDo you have any suggestions for how to adjust the pattern for a much smaller bust, an A cup say? I have been eyeing up the tutorial for quite a while now and decided to make one in the C cup which of course doesn't fit my diminutive chest area(maybe my mum will like it!)but I would like to make one that actually fits me now:) thank you so much fro the tutorial!
ReplyDeleteI'm a 34M. That's going to be some grading!
ReplyDeleteOMG I really must try this. Tony is off tothe footy on Boxing day so I think a sewing session is the order of the day for me. I will let you know how I get on. x Have a great Christmas
ReplyDeleteIs there a suggestions for materials to make this out of?
ReplyDeleteI made my first today and I'm hooked! Fortunately my sewing box is full of useful vintage bits and bobs, like g-hooks and lingerie elastic, so I was able to make one of those neato clasps, which I think is the most brilliant thing ever. I made a muslin tester first to adjust the fit, which was quick and easy, and then made a nice white cotton one for a starter. I'm a 36G, so bras that fit are hard to find. Now I can make my own!! Just lovely. Adds exactly the right shaping to my 50's dresses and sweaters!
ReplyDeleteThank you for this pattern, I was thrilled to discover your blog! Can't wait to make my own.
ReplyDeletehow do I find the following posts for this project? I am a little lost!
ReplyDeleteOh, they're all right here! :) : http://www.vavoomvintage.net/p/va-voom-bullet-bra-sew-along-and-free.html
DeleteDo you have any suggestions on grading the pattern down for smaller sizes? I'm more in the A/B cup range.
ReplyDeleteThanks so much for this, as a really big boob girl who finds those puppies in the way while sewing and especially making lace, I've been wanting a bra that keeps them forward. I'll give this bra a go.
ReplyDeleteThanks so much for this, as a really big boob girl who finds those puppies in the way while sewing and especially making lace, I've been wanting a bra that keeps them forward. I'll give this bra a go.
ReplyDeleteThank you so much for making/posting this pattern! My modern bra size can be super hard to find, so I've wanted to try making my own for some time. Also really excited that it takes so little fabric, as I have a scrap of black silk satin somewhere in my fabric stash that'll make a gorgeous bra.
ReplyDeleteI'm totally new to this project to please bear with me. Do I need to sew the sections together between the lines? And is there a specific order in which they need to be joined.
ReplyDeleteI am Chelly.
Hi I just found this today. have been looking everyvere for a patttern like this. love it. will start tonight :D
ReplyDeletexoxo
emily from sweden
oh em gee! i love this
ReplyDeleteI am definitely going to try this pattern. While I don't have a large bust, they are apparently made of rock because no current style seems to really provide proper support. I'll have to do a bit of resizing, but that's nothing new for me since every pattern I've ever sewn has needed some adjustment. Thank you so much for sharing.
ReplyDelete