


I wanted to share a quick blog design tip today that's very easy to do and (I think) really improves the look of any blog. This is how to remove image shadows.
By default, blogs have this light greyish frame around all of your images, including stuff in your sidebar. If you add a custom signature or any fancy buttons, all of these will have this image shadow. By deleting the shadow, it makes everything have a professional looking, seamless background.


Here's how....
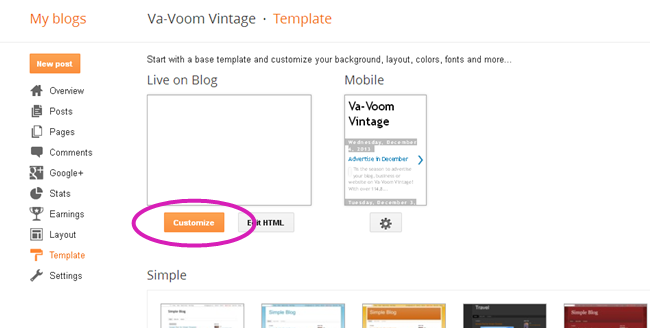
Go to your blogger dashboard, select template

choose the orange "customize" button
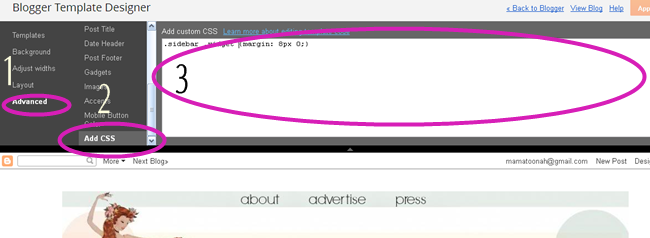
1. click "advanced"
2. scroll down to "Add CSS"
3. paste this entire code in the box:
.post-body img, .post-body .tr-caption-container, .ss, .Profile img, .Image img,
.BlogList .item-thumbnail img {
padding: none !important;
border: none !important;
background: none !important;
-moz-box-shadow: 0px 0px 0px transparent !important;
-webkit-box-shadow: 0px 0px 0px transparent !important;
box-shadow: 0px 0px 0px transparent !important;}
click "apply to blog" and save and you're done!
For all of my blog design tips and tutorials, check out my first e-course, "Bloggerific: How to Write and Design a Beautiful, Successful Blog" now available
Yes, it's huge difference! I prefer on my blog version with shadows, but it's good to know that I can remove it ;)
ReplyDeleteThanks much! I've been trying to figure out how to get ride of those silly boxes around my images forever!
ReplyDeleteGreat tip, thanks!
ReplyDeleteI've been trying to remove that ugly shadow, but wasn't able too fix it. Thanks for sharing!
ReplyDeleteAs usual, you post just the thing I needed before the problem drove me up a wall! Thanks, lady!
ReplyDeleteThanks fo rthis cool tip. I look forward to the e course. Ive read your blog for awhile and never commented I really love i! You are a beautiful lady with awesome and inspiring style
ReplyDeletekate at retro rover
Thank you for this! It is very helpful, as I have no idea when it comes to stuff like this :) I need a blogging-for-dummies-course!
ReplyDeleteThanks a million! I am so un-savvy when it comes to computer stuff that I never would have figured that out. The shadowy frame always bugged me - particularly in the images on the sidebar. You're tops!
ReplyDeleteWhat an extremely helpful post ~ thank you Brittany for sharing your expertise! I applied your code to all five of my blogs toot sweet. They look great. :D
ReplyDeletexox,
bonita of Lavender & Twill
Thank you! I just did it on my blog, and it really does make a difference! I'm not very good with this sort of stuff, and your tips make it so easy.
ReplyDeleteI did it! Thank you so much! Can't wait for the ecourse.
ReplyDeleteMary Ellen
Wonderful, super easy to follow howto. This is always one of the first things I do if I implement a new template - it makes such a world of difference!
ReplyDelete♥ Jessica
This is a super simple how-to but it makes such a difference! I'm excited to see what tips you have in store for the e-course!
ReplyDeletexoxo, Alesha
www.oldfashionedwhimsy.blogspot.com
Every time I come to your blog, I learn something new.
ReplyDeleteWonderful, clear and useful post, darling.
Hug
Marija
Hooray! I still need to buckle down and redo my blog layout, but that little snippet of code makes a huge difference. Thanks for sharing it!
ReplyDelete