

craft tutorials
sewing
vintage living
Today we’re making an adorable novelty clock throw pillow from 1955.


Make a 1950s clock throw pillow
Today we’re making an adorable novelty clock throw pillow from 1955.
This is a simple and inexpensive project that can be whipped up in about a half and hour or less!
Materials
2 circles black felt 13.5 inches across
1 strip black felt 42 inches by 4 inches plus a little extra felt for circles and clock hands
1 circle mustard colored felt 9.5 inches across
pillow filling
black thread
liquid stitch or iron on adhesive
Process
Pin the strip of black felt to one circle and sew along round edge
Clip the edges
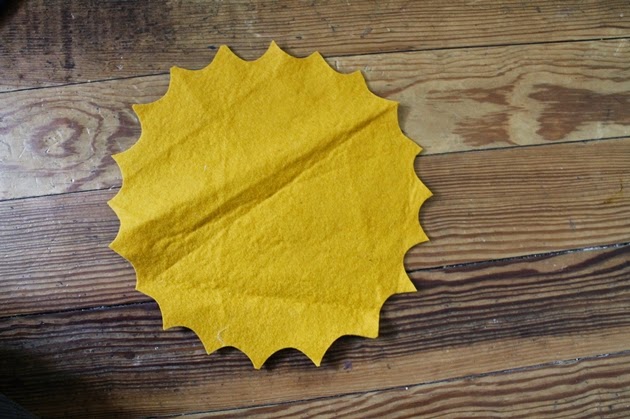
fold mustard circle in half twice to form a triangle shape
cut little snippets out, all around the circle as shown. When you open the circle, it will look like a sunburst
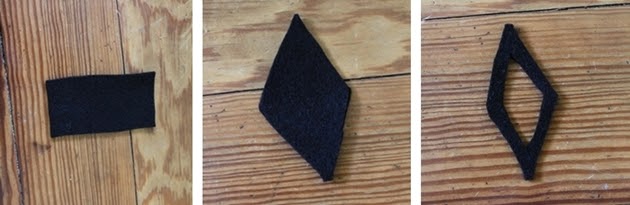
cut two rectangles for the clock hands.
fold in half lengthwise
cut into a triange
cut a triange shape out
cut 12 small (approximately 1/2 inch) circles out of the black felt and arrange them in a clock face on the mustard starburst.
attach circles and clock hands with iron on adhesive
iron the clock face onto the center of the remaining black circle
with right sides together, pin the remaining circle to the black strip and sew, leaving the ends of the strip open
Turn right side out and stuff the pillow.
Finish the pillow by sewing the small opening closed by hand.

beauty tutorials
hair tutorials
vintage for beginners
vintage hair

I tried a new beehive hair style this week with a mesh chignon form. It literally takes about two minutes to do and it's one of my new go-to hair styles
bobby pins
one mesh chignon form mine is from Hot Buns
hair brush
hair spray (optional)
start with hair parted however you like
brush the hair from the crown forward and pin the bun form to your crown. I do a pin at each side and one in the middle


Brush all of your hair back and over the form. If your hair is slippery, you can use a teasing comb like mine from Sally's to give it a little grip. You don't have to tease too much here.

grab the back of your hair and gather it as if you're doing a pony tail. Twist it, fold up and tuck the ends in and pin in place with bobby pins or a hair comb.


If your bangs don't want to sweep to the side like mine, show them who's boss with the teasing comb and a little hair spray.


Tutorial: Lazy Girl's Beehive Hair
I tried a new beehive hair style this week with a mesh chignon form. It literally takes about two minutes to do and it's one of my new go-to hair styles
bobby pins
one mesh chignon form mine is from Hot Buns
hair brush
hair spray (optional)
start with hair parted however you like
brush the hair from the crown forward and pin the bun form to your crown. I do a pin at each side and one in the middle
Brush all of your hair back and over the form. If your hair is slippery, you can use a teasing comb like mine from Sally's to give it a little grip. You don't have to tease too much here.
grab the back of your hair and gather it as if you're doing a pony tail. Twist it, fold up and tuck the ends in and pin in place with bobby pins or a hair comb.
If your bangs don't want to sweep to the side like mine, show them who's boss with the teasing comb and a little hair spray.

10 style lessons
hollywood
vintage for beginners
10 Style Lessons from Audrey Hepburn
Lately, I've been inspired by classic 1960s fashions. Sleek silhouettes, bold lines and simple staples make for effortlessly chic outfits. Today we take 10 lessons in style from 1960s star, Audrey Hepburn. Her film costumes like the black dress in Breakfast at Tiffany's and fabulous dress in My Fair Lady have become ionic over the years but its her personal fashion choices while off the set that has never gone out of style.

1. ballet flats
Simple ballet flats can be worn with just about anything. They're smart, comfortable and give a certain elegance to polish off the look
2. stripes in shirts or pants
horizontal stripes in a knit boat neck top are a 60s classic or elongate your legs with daring vertical striped cigarette pants
3. collared shirts
youthful peterpan collars or a menswear twist with a button down were common in Audrey's wardrobe. Play with solids and plaids or layer with a cardigan and tailored trousers
4. natural brows
Audrey softened her look and made her eyes the main feature with beautiful natural brows. It's easy to go overboard with the tweezers but a full brow can be so sophisticated.
5. perfect fitting pants with loafers
her playful attitude and wide eyed look was the perfect contrast to her boyish style choices
6. cover your head if playing in the sun
Fashionable and smart, she knew to protect your beautiful face and hair from the harsh rays with adorable scarves and straw hats
Embed from Getty Images
7. Show off your waist
Audrey had such a lovely, slender figure and a waist to envy. She showed it off with a cinched belt, sweet little play suits and form fitting pants. Create the look of a smaller waist with a full skirt and tucked in blouse.
8. tomboy outfits with girly hairstyles
Audrey really paid attention to doing one or the other. She played up her eyes and kept a soft lip and Wore tailored clothes with no-fuss hair.
9. wear one really spectacular accessory
Audrey was an expert at choosing just the right accessories. When off the film set, she usually went with one big statement piece like over-sized sunglasses, a really fun hat or bold color blocking.
10. feel comfortable in what you wear
whether in pants or a feminine dress, she always looked really relaxed and comfortable with herself because she knew that confidence was the most important accessory. Always choose clothes that make you feel good, inside and out.

craft tutorials
diy style

This month, we're adding some much-needed pops of color to your winter wear.
Foundation Item: Your Winter Coat
I have several vintage coats for winter but this one is one of my favorites. Its a heavy wool 1960s coat with a beautiful collar. I fell in love with the colors when I spotted it at the thrift store and since coats were 50% off that day, I couldn't resist.


Cut a flat section of the chipboard box and use the end of your cup to trace out 4 circles

Cut 4 felt circles just a hair bigger than your chipboard circles

sandwich the 1 board circle between two felt circles chip board between the felt circles and stitch around the outside. You can do a quick whip stitch. Here I used a blanket stitch. If you don't sew, you could probably just hot glue the edges being careful to trim excess glue so it looks nice.

Pull your flowers apart as desired and hot glue the flowers in a beautiful arrangement to make a large boutonniere. The 1940s book recommends violets but you can use anything.

sew or glue the pin back to the back of the bouquet

add one pin to the lapel of your winter coat and the other to a muff or handbag.


pick up inexpensive knit gloves to match the flowers or if you have some vintage ones in your collection, pair them with your winter coat and hang on tight because spring will be here soon!
Stay tuned next month for our 40s Fashion Calendar February project!
40s Fashion Calendar January: Make a Flower Brooch
This month, we're adding some much-needed pops of color to your winter wear.
Foundation Item: Your Winter Coat
I have several vintage coats for winter but this one is one of my favorites. Its a heavy wool 1960s coat with a beautiful collar. I fell in love with the colors when I spotted it at the thrift store and since coats were 50% off that day, I couldn't resist.
Cut a flat section of the chipboard box and use the end of your cup to trace out 4 circles
Cut 4 felt circles just a hair bigger than your chipboard circles
sandwich the 1 board circle between two felt circles chip board between the felt circles and stitch around the outside. You can do a quick whip stitch. Here I used a blanket stitch. If you don't sew, you could probably just hot glue the edges being careful to trim excess glue so it looks nice.
Pull your flowers apart as desired and hot glue the flowers in a beautiful arrangement to make a large boutonniere. The 1940s book recommends violets but you can use anything.
sew or glue the pin back to the back of the bouquet
add one pin to the lapel of your winter coat and the other to a muff or handbag.
pick up inexpensive knit gloves to match the flowers or if you have some vintage ones in your collection, pair them with your winter coat and hang on tight because spring will be here soon!
Stay tuned next month for our 40s Fashion Calendar February project!
Outfit
basic dress- modern navy jersey
winter coat- vintage, thrifted
basic shoes- t straps from Amerimark
1940s handbag- middle of no where antique store
new boutonnieres
old gloves to match
Check out my ebook, Pins for Pin-Ups: DIY Brooches for Retro Girls for more novelty brooch tutorials using things that you already have around the house!

Check out my ebook, Pins for Pin-Ups: DIY Brooches for Retro Girls for more novelty brooch tutorials using things that you already have around the house!


craft tutorials

On Tuesday afternoon, the kids and I made some really fun 1960s place mats that I found in one of my vintage craft magazines. This a great no-sew project for a rainy day and even better when little ones can help too! I think we'll have to make different sets for each of the holidays. Wouldn't these be cute as Easter eggs or Christmas trees?
1/2 yard clear vinyl
roll of clear contact paper
roll of aluminum foil
bottle white school glue
colorful tissue paper
4 sheets construction paper 12 by 17inches
Cut the vinyl into 12 by 18 inch rectangles. I got 4 place mats from a 1/2 yard
Cut the foil into 11.5 by 17.5 inch rectangles. The average width of foil is about 12 inches
Cut contact paper into 12 by 18 inch rectangles
Cut colorful tissue paper into various shapes. You can do squares, circles, strips...the kids had me cut out fish and all kinds of things. If you have paper punches or fun scissors for scrap booking, this is a great time to use them! We just used regular scissors and pinking shears. I separated the colors into separate dishes to make it easy and less of a mess

gently crumple your foil into a ball, then unfold and flatten out. Rhys got a little too excited with his foil ball crumpling so we had to re-do. No big deal, there's plenty of foil in the roll. We had fun pounding the foil flat with our palms.


In a plastic cup or dish, mix glue and water so its very thin. Using an inexpensive paint brush, paint glue on the non-shiny side of the foil

arrange shapes of tissue however you like. Overlapping colors will show through, which can create a really neat effect.


Experiment with geometric shapes and uneven lines for a kitchy retro look
When you're done with your tissue, lay them flat to dry for several hours.
To finish
trim a little bit off the edges of the place mats. I trimmed about a half inch on each side. Don't you love the bacon and eggs?

lay the place mat face down on the table.
peel the backing off the contact paper and lay sticky side down on the back of the place mat. The contact paper is slightly larger than the finished place mat so you should have about an inch border all the way around the place mat. This border is really helpful in not getting bubbles in your contact paper. If you stick the border to the table, all you have to do is pull the roll towards you as you encase the place mat.

peel the place mat off the table and flip over, face side up

next, very carefully and slowly apply the vinyl to the top. Press the sticky contact paper to the vinyl, sealing the edges. Its hard to see but there's vinyl on top

Trim off the excess border and you're done!

They're pretty silly but most mid century craft decor is and they're really fun to make!

Tutorial: Make 1960s Place mats
On Tuesday afternoon, the kids and I made some really fun 1960s place mats that I found in one of my vintage craft magazines. This a great no-sew project for a rainy day and even better when little ones can help too! I think we'll have to make different sets for each of the holidays. Wouldn't these be cute as Easter eggs or Christmas trees?
1/2 yard clear vinyl
roll of clear contact paper
roll of aluminum foil
bottle white school glue
colorful tissue paper
4 sheets construction paper 12 by 17inches
Cut the vinyl into 12 by 18 inch rectangles. I got 4 place mats from a 1/2 yard
Cut the foil into 11.5 by 17.5 inch rectangles. The average width of foil is about 12 inches
Cut contact paper into 12 by 18 inch rectangles
Cut colorful tissue paper into various shapes. You can do squares, circles, strips...the kids had me cut out fish and all kinds of things. If you have paper punches or fun scissors for scrap booking, this is a great time to use them! We just used regular scissors and pinking shears. I separated the colors into separate dishes to make it easy and less of a mess
gently crumple your foil into a ball, then unfold and flatten out. Rhys got a little too excited with his foil ball crumpling so we had to re-do. No big deal, there's plenty of foil in the roll. We had fun pounding the foil flat with our palms.
In a plastic cup or dish, mix glue and water so its very thin. Using an inexpensive paint brush, paint glue on the non-shiny side of the foil
arrange shapes of tissue however you like. Overlapping colors will show through, which can create a really neat effect.
Experiment with geometric shapes and uneven lines for a kitchy retro look
When you're done with your tissue, lay them flat to dry for several hours.
To finish
trim a little bit off the edges of the place mats. I trimmed about a half inch on each side. Don't you love the bacon and eggs?
lay the place mat face down on the table.
peel the backing off the contact paper and lay sticky side down on the back of the place mat. The contact paper is slightly larger than the finished place mat so you should have about an inch border all the way around the place mat. This border is really helpful in not getting bubbles in your contact paper. If you stick the border to the table, all you have to do is pull the roll towards you as you encase the place mat.
peel the place mat off the table and flip over, face side up
next, very carefully and slowly apply the vinyl to the top. Press the sticky contact paper to the vinyl, sealing the edges. Its hard to see but there's vinyl on top
Trim off the excess border and you're done!
They're pretty silly but most mid century craft decor is and they're really fun to make!

building a vintage wardrobe
diy style

This year, I really wanted to use what I have a buy less. The modern woman typically has more clothes, shoes and accessories than any of our grandmothers did. They used their crafty talents and smart style to create different outfits from just a few pieces.
Every month from now till December, I'll put together one fabulous 1940s inspired outfit with a little bit of sewing and a few basics. This calendar of fashion is from my 1940s book The Complete Book of Sewing, which is a staple in many of our sewing book collections. You can join along too. Here's our foundation items that you'll need for each outfit
40s Fashion Calendar Foundation Items
1 winter coat in any color or fabric that you like
1 small brimmed hat in any fabric, in a neutral color. Mine will be straw
1 simple suit (skirt and jacket) in a neutral color
1 dark colored bolero (will discuss patterns to sew your own)
1 pillbox hat in a neutral color (will provide a tutorial to sew your own)
1 basic dress in any solid color and in a non-sheer fabric
edit: If you don't have a suit, you can pair any skirt with a blazer, jacket or cardigan! The book recommends a suit because that was typical for any lady in the 40s but we're modern girls so don't be afraid to get creative and make the look your own! My "suit" is a thrifted navy 70s skirt and a 40s jacket. Definitely not matching but they're both navy so it works for me!
These items can be vintage or modern, new or something from your closet already. This is a great opportunity to wear some of the boring, plain things that get stashed in the back. To complete the look, you'll want a simple pair of comfortable shoes. I picked two- thrifted brown loafers and black t-straps with a low heel.
Each month, we'll add something to each piece or remove things that we've added previously. Some months will include a little sewing like making collars for a jacket or whipping up a simple 40s blouse. If you play along, you can use #40sfashioncalendar to show what you made
The 40s Fashion Calendar
This year, I really wanted to use what I have a buy less. The modern woman typically has more clothes, shoes and accessories than any of our grandmothers did. They used their crafty talents and smart style to create different outfits from just a few pieces.
Every month from now till December, I'll put together one fabulous 1940s inspired outfit with a little bit of sewing and a few basics. This calendar of fashion is from my 1940s book The Complete Book of Sewing, which is a staple in many of our sewing book collections. You can join along too. Here's our foundation items that you'll need for each outfit
40s Fashion Calendar Foundation Items
1 winter coat in any color or fabric that you like
1 small brimmed hat in any fabric, in a neutral color. Mine will be straw
1 simple suit (skirt and jacket) in a neutral color
1 dark colored bolero (will discuss patterns to sew your own)
1 pillbox hat in a neutral color (will provide a tutorial to sew your own)
1 basic dress in any solid color and in a non-sheer fabric
edit: If you don't have a suit, you can pair any skirt with a blazer, jacket or cardigan! The book recommends a suit because that was typical for any lady in the 40s but we're modern girls so don't be afraid to get creative and make the look your own! My "suit" is a thrifted navy 70s skirt and a 40s jacket. Definitely not matching but they're both navy so it works for me!
These items can be vintage or modern, new or something from your closet already. This is a great opportunity to wear some of the boring, plain things that get stashed in the back. To complete the look, you'll want a simple pair of comfortable shoes. I picked two- thrifted brown loafers and black t-straps with a low heel.
Each month, we'll add something to each piece or remove things that we've added previously. Some months will include a little sewing like making collars for a jacket or whipping up a simple 40s blouse. If you play along, you can use #40sfashioncalendar to show what you made

6 Luxurious Treats for Girls Night In
I know a lot of people loathe Valentine's Day. Its a big commercial holiday with a lot of expectations and it can be a bummer for the single girl. Single, dating or married- I think a girl should take this time to treat and love herself! One of my favorite things to do- which doesn't happen often is relax in a hot bubble bath with a good read and a beautiful vintage robe waiting for me when I get out. Here are my top picks for a much-deserved Girl's Night In!
 Angeline Dressing gown from Maddy James


This post contains links to my sponsors and affiliates. Please see my full disclosure policy

This post contains links to my sponsors and affiliates. Please see my full disclosure policy
Subscribe to:
Posts (Atom)