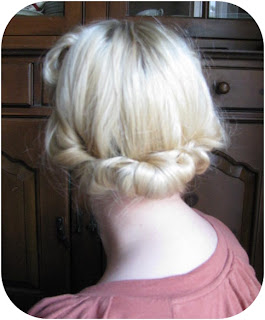
If you know how to do victory rolls, this style can be achieved without rats. However, I wanted to make it as simple as possible for everyone so I'll be using rats in this tute.
Oh, Rats!
You can easily make your own rats. Traditionally, women saved hair from their hair brushes but hair not on my head really grosses me out. You can easily make your own rats using my tutorial for fishnet stocking hair rats. I really love using a mesh bun donut from Sally's, cut in half.The mesh ones are great because I unroll the mesh to make different sized rats. Today, I'm using wool roving, which can be found at many craft stores or knitting supply stores. I saw this mentioned on Quaintrelle Life and thought it was such a brilliant idea for girls with odd hair colors. Thank you, Viv!!
You will need
hair spray
a brush
3 hair rats
pins
Firstly, I'm sorry, my hair was looking pretty insane today. I tried a new curling method last night and it worked well but ended up pretty silly when I was done experimenting with it!
Begin by parting your hair down the middle

Starting with one side, section the hair from in front of your ear to the top of your head

Hold the hair above your head and wrap the ends of your hair around the rat

Continue rolling the hair down towards your scalp and pin it into place by inserting a pin in the front and back of the roll at the scalp. If needed, secure bits of hair sticking out with more pins.

If your rat shows in the front, just give it a little poke with your finger to get it to stick down in there. You can also use your fingers to gently spread the roll out lengthwise and pull a bit more hair towards the front of the roll to hide the rat.

Do the same thing on the other side. Holding your hair above your head and rolling downwards creates a nice, high roll. If you prefer to have your rolls on the side, hold the hair out to the side.

Next, brush out the back section and wrap the ends of your hair around the remaining rat. Roll it up, towards the nape of your neck. Now, the back can get tricky if your hair is on the shorter side. sometimes, I tease this section or use some product to keep my hair from slipping out of the rat. It takes some practice but once you get the hang of it, rolling the back section is a breeze.

Pin the roll on each side, sliding the pins sideways into the roll so they don't show. If your hair is on the shorter side, you may need several pins. Be sure that all of the little strands are tucked into the roll and your rats aren't exposed.


Finish it up with hairspray and that's it! If like me, it didn't turn out as smooth as you like, you can embellish the back roll with a pretty flower, hair comb or bow.


This has been my favorite lazy hairstyle (sans rats..) this Summer too! So easy and pretty.. Thank you for posting:)
ReplyDeleteYou are so pretty, you look radiant.
ReplyDeleteAnd I really like the blonder blond. It suits you.
Thanks for the post! I love V-rolls.
That's such a pretty style :)
ReplyDeleteI have some rats made from cheap clip in extensions :)
Loving these hair posts. Thanks
ReplyDeletexo
Beautiful! (I only wish there was a more elegant name for "rats", lol)
ReplyDeleteHave you ever used Spin Pins? They're like bobby pins, but you need 3 instead of 30. I've done a style similar to yours with them:
ReplyDeletehttps://picasaweb.google.com/lh/photo/matjNu-hLiCZSPQiX6iGmA?feat=directlink
I LOVE your rat-making abilities! Very clever!
Very chic!! Very Austen, love it!
ReplyDeleteAlice- Lol! I agree! rats- yuck!!
ReplyDeleteJodi- I've seen them but I haven't tried them yet. I'll have to pick some up and give it a whirl- Thanks for the tip!! :)
See. Now. The back roll is something that I just CAN'T do. It makes me want to weep!! But I shal persevere!
ReplyDeleteOh, that looks lovely!
ReplyDeleteThat's beautiful! Thanks for the idea!
ReplyDeleteI love this, especially the roll in the back! I think my hair might be too long for the roll in the back *sigh*. Love it though!
ReplyDeletexo,
Em
Thank you for sharing!
ReplyDeleteHow great! I have been looking for this kind of blog for ages,it's perfect! I'm definitely going to try all these hairstyles! Hope my hair isn't to long...
ReplyDeleteThanks a lot!
x
http://the-fantastic-voyage.blogspot.com
Such a cute smile!
ReplyDeleteOmg thank you this whole time I have been trying so hard to get that curl but it just wouldn't stay no matter how many pins and now I know the secret...the "rats" outa the bags lol I'm so excited to try this thank you!
ReplyDelete